

Want to access your website on a local host via a domain name, say something like mywebsite.test? There are few benefits to doing so.
- You can create shortened URLs to be able to access your local website easily
- If your project is located in a subfolder, you could route the domain directly into the subfolder. For example, let's say, your website is located at C:xampp/htdocs/folder/example/. Instead of typing the full URL, you could route your custom domain to that specific subfolder.
- You get the idea. There are a number of things you can accomplish better with this. This process assumes you are running Windows 10 and XAMPP environments. It might work differently for other operating systems or different versions of those systems.
Step 1. Open the directory below in file explorer:
C:\Windows\System32\drivers\etc
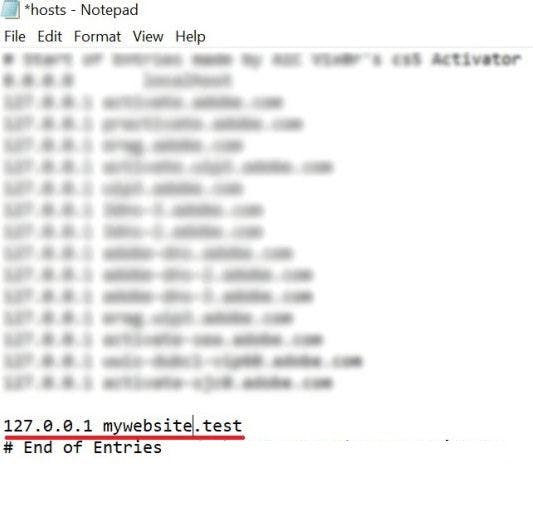
Step 2. There you will find a file called "hosts". Double-click on the file to open it. If it asks you to choose a program to open it, choose "Notepad" or your preferred text editor.
Step 3. Scroll to the end of the file and add the following line:
127.0.0.1 example.test
Note:
- Type in your local machine address(127.0.0.1) follow by the domain name. You can use any extension(.test .mywork .dev). Do not use common extensions (such as .com, .net, .io, etc), otherwise it will conflict with your access to other websites on internet.
Step 4. Click Save(Shortcut for Windows is CTRL+S) to overwrite the changes to the file. In the "Save Type As" dropdown select 'All Files'. There should be a popup window asking you if you want to replace the file. Click "Yes".
You could get a message prompt saying that you don't have the right/administrator permissions to replace the file. If you do, Go to step 4.1 , if not skip to Step 5.
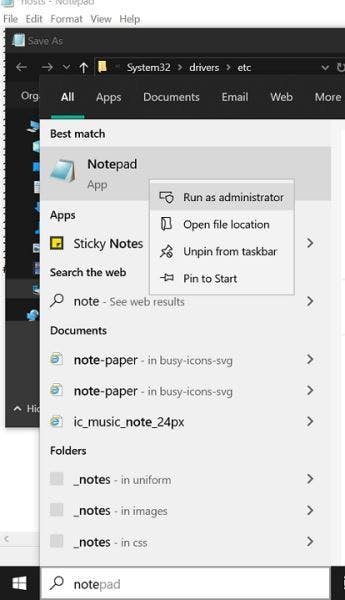
Step 4.1. In your windows startup search bar, type "notepad". Right-click on notepad and run it as administrator.
Copy the full contents of hosts file that we previously opened in step 3. Paste the content into the notepad file that you opened as an administrator in step 4.1.
Click "Save As" on the new notepad. For "Save Type As" select 'All Files'. Change the directory on the Save Popup Window to the following folder:
C:\Windows\System32\drivers\etc
You will see a file on top called "hosts". Select the file and it will prompt "file already exists, do you want to override the file?", to which you must select "Yes".
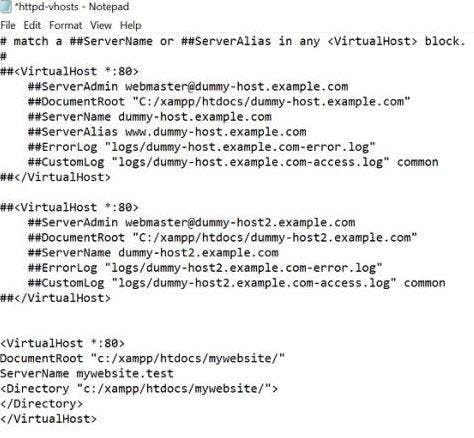
Step 5. Open following directory
C:\xampp\apache\conf\extra
Double click to open a file called "httpd-vhosts". If it asks you to choose a program to open it, choose Notepad.
Step 6. Scroll to the bottom end of the file and add the following code:
<VirtualHost *:80#62;
ServerAdmin example.test
DocumentRoot "C:/xampp/htdocs/foldername/"
ServerName example.test
</VirtualHost#62;
You should replace "c:/xampp/htdocs/example/"with location of your project. Example, if your project is in a subfolder then add the subfolder “ c:/xampp/htdocs/folder/subfolder/
ServerName (example.test) should also be replaced your chosen domain name. Note it must be the same domain name that you used in Step 3.
Next restart your xampp. (Stop & Start the apache service). Type in your new domain name into the browser's search bar and you are good to go.